
Easy Guide to Installing a Subway Tile Backsplash: DIY Edition
If you are looking for some change and want to recreate and give a brand new look to your kitchen, bathroom, or any utility room that too without being heavy on your pockets, then we have a solution for Subway tile backsplash. Subway tile backsplash will provide an aesthetic appeal, visual diversity, and color to your space. Subway tile backsplash helps you to protect your walls from dampness and from food spatter anywhere in your house.
Not only in the house, but subway tile has made its space into the office wall due to its impact and easy-to-achieve nature. It is a popular choice due to its timeless design, affordability, and ease of installation. Along with these other advantages are that they are easy to clean and ask for low maintenance.
In this beginner’s guide, we’ll walk you through the process of installing a subway tile backsplash, sharing essential dos and don’ts, practical tips and tricks, and some creative ideas for a budget-friendly DIY backsplash.
Origination of Subway Tile
George C. Heins and Christopher Grant LaFarge, these two architects, developed the idea of subway tile in the year of 1904. They installed the subway tile with the purpose of increasing attraction in local travelers and making it easy to clean at NYC Subway in 1904. By the time of the 1920s, people had started to install subway tiles in their areas of houses with different purposes, and until now, it has been a choice of people and never got out of fashion.
Traditionally, Subway tile is thick and low-fired with a rectangular size of 3” by 6”. But now, with time, the style, size, and appearance of tile have changed. It is available in various dimensions, ranges, designs, and colors, which help you to create traditional to modern or hyper-modern designs in your opted area of house or office.
Important Considerations for Subway Tile Backsplash
Before moving towards the installation process, let us gather some very basic yet important information about the subway tile, like available material, sizes, and grout.
1. Subway Tile Material

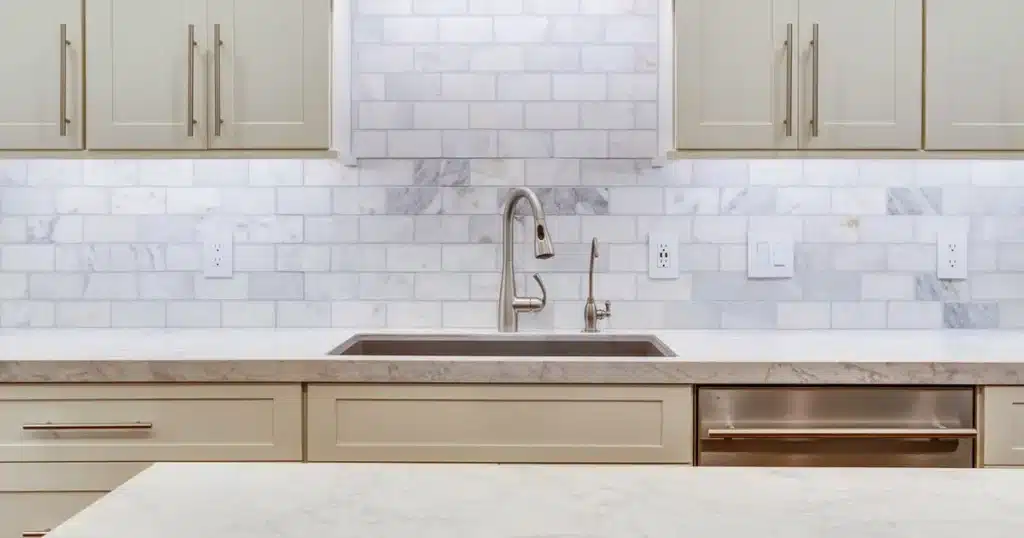
If you have come to the conclusion that any part of your house requires subway tile installation, then it is very important to opt for the right material for the subway tile. There are multiple material options available at the stores as well as online shops. Subway tiles are available in materials like ceramic, glass, marble, stone, or high-end granite.
Your personal choices of style and designs also affect it. One of the important factors that we can not miss out on is your budget. After considering all the above elements, you will be able to select the right material for the subway tile backsplash for the opted space.
2. Subway Tile Size

Once you are done with deciding the material you are going to use, now it is time to select the size of the subway tile you are going to install. Well, you are going to explore a wide range of dimensions in the size of subway tiles to dream, create and play. You can also select the small size of squares and bricks for the backsplash wall.
You need to measure the square footage of the surface area where you are planning to install a Subway tile backsplash. This measurement will lead you to understand how much you need to source for your project. If needed, you can also install the subway tile on the ceilings too.
3. Subway Tile Grout
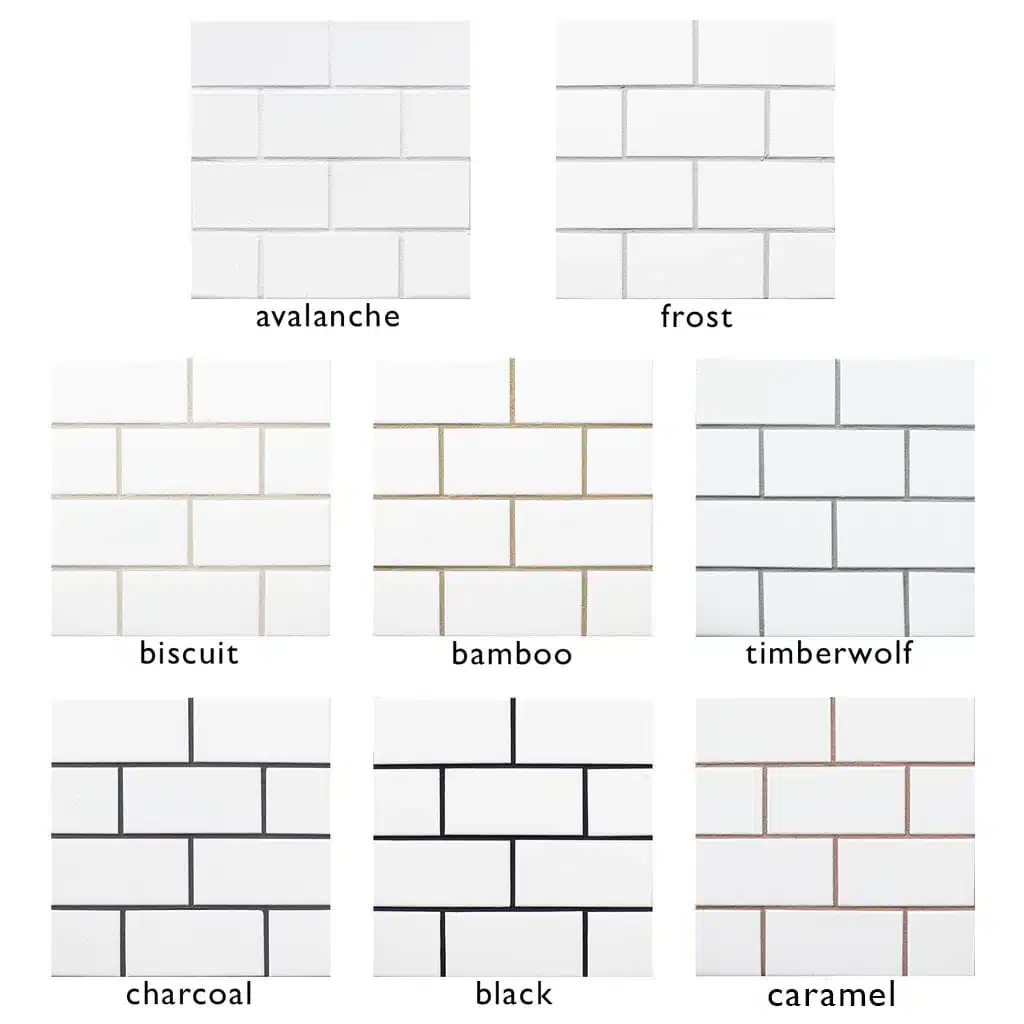
Subway tile grout is a mixture of cement, color pigment, and lime in powder form. Sometimes one type of sand is also mixed into the powder, which gets hard when mixed with water and strengthens the stickiness of the tiles with one another. The grey grout is very common for usage, but it is also available in a number of colors which are used according to the color of the tile selected.
It provides a finishing look to your walls. The major advantage is that grout prevents dirt and debris from entering in between the tiles and protects it.
How to Install Subway Tile Backsplash at Home
Installing a subway tile backsplash may seem daunting at first, but with the right approach and a little patience, it can be a rewarding DIY project. Do these to achieve the best results.
Necessary Tools and Materials to Gather
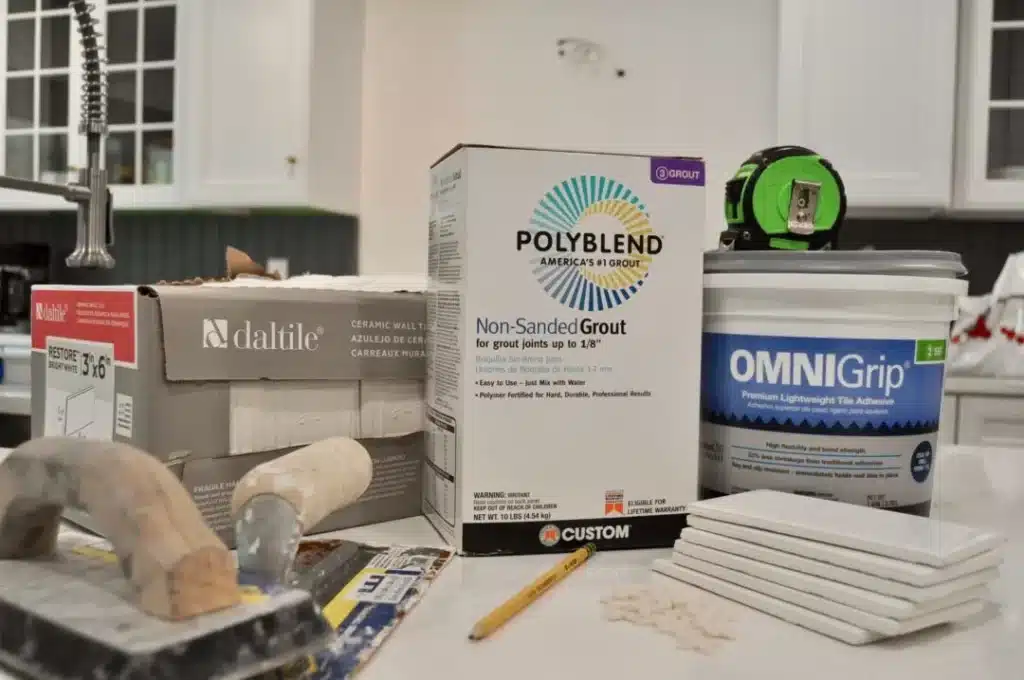
Before starting the project, keep yourself completely equipped with all the resources. The list of resources is provided here kindly go through and gather the things according to your requirements.
- Subway tiles
- Tile adhesive
- Tile spacers
- Notched trowel
- Tile cutter or wet saw
- Grout
- Grout float
- Sponge
- Tile sealer
1. Prepare the Surface

To take the first step towards installation is to prepare your surface for the subway tile backsplashinstallation. Make your surface clean and dry completely. Make sure that it does not contain any kind of grease or debris on it. If needed, sand down any uneven areas and patch any holes or cracks. The smooth and even surface will ensure better tile adhesive.
2. Plan the Layout

Before applying the adhesive, plan the layout of the subway tile backsplash. This step is crucial to ensure a balanced and visually appealing design. Consider the size of the tiles, the patterns you want to create, and any other points that you want to highlight.
For the pattern, you have a wide range of choices like classic offset, mosaic tile, glass tile, herringbone, etc. Use tile spacers to maintain the consistency of space between tiles to attain professional touch. Visit this link for more detailed information.
3. Apply the Adhesive

You need to spread a thin layer of tile adhesive on the wall by using a notched trowel. You must make sure that the layer spreads from bottom to top evenly. Work in a small section to prevent the adhesive from drying out before you place the tile. You must apply adhesive only to the area that you can cover for a maximum of 15 to 20 minutes comfortably.
4. Install the Subway Tiles

Now It’s time to install the subway tile and get your desired look of the space. You need to press very carefully each subway tile into the adhesive. You make sure that this procedure aligns with the layout planned earlier. You wiggle the tile back and forth gently to ensure that its bond with the wall is strong.
Now insert the tile spacer between the tiles to maintain consistency and even spacing between tiles. You need to repeat this process until the whole surface is covered with subway tile.
5. Cut Tiles to Fit

While installing the subway tile, when you reach the edges, corners, or outlet of the surface, you need to cut the tile according to the measurement to fit the tile in that specific part. Measure that space carefully. Use a tile cutter or wet saw to make a precise cut. Always wear protective goggles to avoid any harm.
Always follow all the safety measures given to you by the experienced person while operating a cutting tool.
6. Allow Adhesive to Dry

After completion of all the above procedures, now it’s time for you to relax for a while and let the adhesive do its part. Provide enough time for the adhesive to dry and set the tile in the wall in its place. You need to follow the instructions of an experienced person. Generally, it takes 24 hours to dry up the space. Avoid any excessive moisture during this period to ensure a strong bond.
Grout the Tiles

Now it’s time for you to apply the grout. Prepare the grout mixture according to the instructions given to you. To apply the grout mixture, you need to use its tool grout float. Spread the mixture diagonally across the tiles and press it into the gaps. You need to remove excessive grout using a damp sponge in a circular motion. You must be careful with this process in order to ensure that only the excessive grout is removed.
Clean and Seal the Tile
After the grout has partially dried, use a damp sponge to wipe away the grout haze from the tiles’ surface. Allow the grout to cure completely according to the given instructions before applying the tile sealer. Applying a sealer will protect the grout and tiles from stains and make cleaning easier in the long run. Follow the sealer manufacturer’s instructions for the application process.
Tips and Tricks for a Successful Subway Tile BacksplashInstallation
Here are some additional tips and tricks to make your DIY subway tile backsplash installation even easier:
- Keep a damp sponge or cloth handy to wipe away any excess adhesive or grout as you work. It’s easier to clean up immediately rather than letting it dry and harden.
- Using high-quality tools, such as a tile cutter or wet saw, will make the cutting process smoother and give you more precise results.
- To ensure a flat and even surface, consider using a tile leveling system. These systems help maintain consistent tile height and eliminate lippage which means uneven edges between tiles. They are especially useful for larger format tiles or when using stacked subway tile patterns.
- For a classic subway tile look, stagger the joints between tiles. Ensure that the grout lines of your tiles in a single row do not end up aligning themselves with the lines located below or above. Staggering the joints creates a visually appealing pattern and adds stability to the installation.
- Back-buttering is the process of applying a thin layer of adhesive to the back of each tile before placing it on the wall. This ensures better tile adhesion and helps compensate for any unevenness in the wall surface. Use the flat side of the trowel to apply the adhesive and then comb it with the notched side before setting the tile.
- While installing the tiles, keep a damp cloth or sponge handy to clean excess adhesive or grout from the surface of the tiles and the grout lines. Cleaning as you go will save time and make the final cleaning process much easier.
- To create a professional and finished look, consider using tile corner edging or bullnose tiles for the exposed edges of the backsplash. These specialized tiles have a rounded edge that provides a smooth transition and protects the edges from chipping or damage.
- When planning your subway tile backsplash, consider the lighting in your kitchen. Subway tiles can reflect light, enhancing the brightness and overall ambiance of the space. Take into account natural light sources as well as artificial lighting fixtures to maximize the effect.
Easy DIY Backsplash Kitchen Ideas on a Budget
If you’re looking for budget-friendly ideas to enhance your kitchen with a subway tile backsplash, here are a few creative options:
1. Painted Subway Tile Backsplash

If you’re on a tight budget or renting your home, you can achieve a similar look by painting a faux subway tile pattern directly onto your existing backsplash using stencils and tile paint.
2. Peel-And-Stick Subway Tile Backsplash

Peel-and-stick tiles offer a quick and affordable way to transform your kitchen without the need for adhesives or grout. Simply peel off the backing and stick the tiles onto the wall. There are multiple varieties of peel-and-stick subway tile backsplash available online.
3. Mosaic Subway Tile Backsplash
Create a unique and eye-catching backsplash by using different colors or patterns of subway tiles to create a mosaic design. This can be an excellent way to add a pop of color or visual interest to your kitchen.
4. Vinyl Decal Backsplash

Vinyl decals offer a simple and cost-effective way to add a stylish backsplash to your kitchen. Choose from a variety of patterns and designs that mimic the look of tiles or intricate patterns. Simply peel and stick the decals onto your clean and dry wall for an instant transformation.
5. Chalkboard Backsplash

Create a functional and unique backsplash by painting a section of your kitchen wall with chalkboard paint. This not only adds a touch of creativity but also provides a practical space to jot down grocery lists, recipes, or inspiring quotes. Customize the shape and size of the chalkboard area to suit your preferences.
6. Reclaimed Wood Backsplash
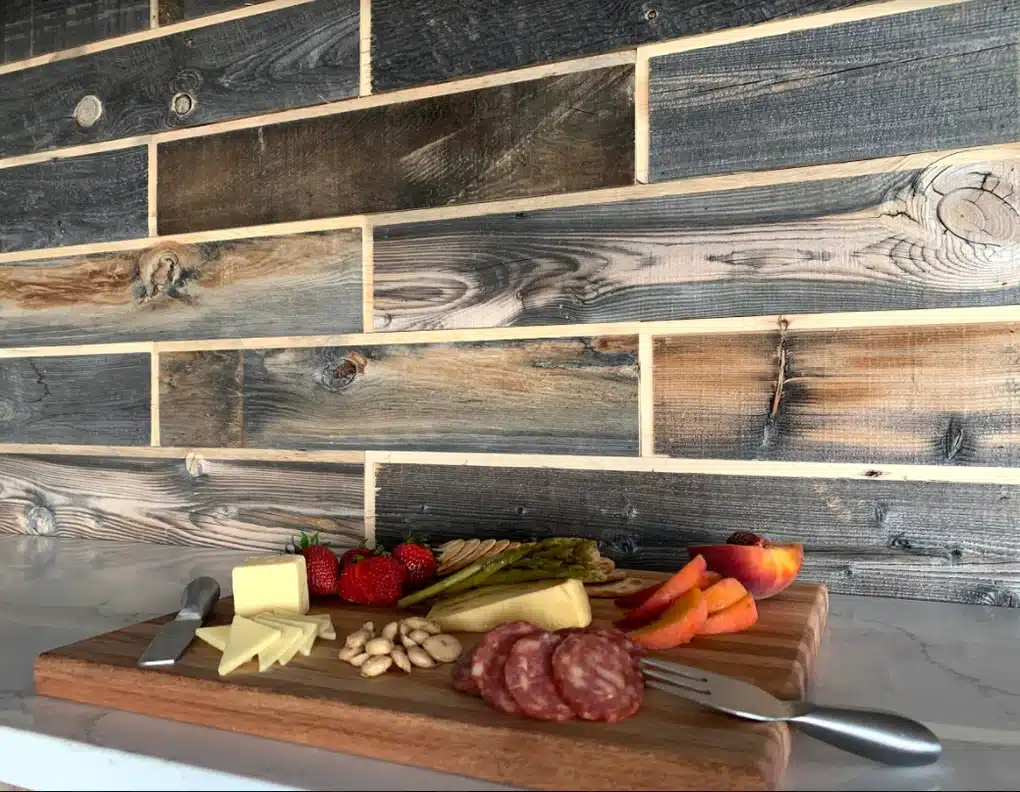
For a rustic and charming look, consider using reclaimed wood as your backsplash material. Look for salvaged wood pieces or old pallets that can be cleaned, sanded, and cut to size. Attach the wood pieces to the wall using construction adhesive, and seal with a protective coat of clear varnish for durability.
7. Mirror Backsplash

If you want to create an illusion of a larger and brighter kitchen, opt for a mirror backsplash. Mirrored tiles or a single large mirror can be affixed to the wall using mirror adhesive. This reflective surface not only adds visual depth but also reflects light, making the space appear more spacious and airy.
8. Wallpaper Backsplash

Choose a wallpaper design that complements your kitchen décor and mimics the look of tiles, bricks, or geometric patterns. Ensure you select a washable and moisture-resistant wallpaper. Apply it to a clean and primed wall using wallpaper adhesive. Seal the wallpaper with a clear, waterproof sealant for added protection.
Final Words
Installing a subway tile backsplash is an accessible DIY project that can instantly elevate the appearance of your kitchen. By following the steps outlined in this beginner’s guide, considering the dos and don’ts, and incorporating the provided tips and tricks, you can achieve a professional-looking result without breaking the bank.
Whether you’re a novice or an experienced DIY enthusiast, with careful planning and attention to detail, you’ll be able to enjoy a beautiful subway tile backsplash that enhances the overall aesthetic of your kitchen. So roll up your sleeves, gather your tools, and get ready to create a stunning backsplash that will be the envy of all your friends and family.
Happy tiling!


