
How to Install DIY Range Hood Covers with Storage
Are you refurbishing your kitchen and are upset about how your current range hood cover looks? Rather than mulling over how to replace the range hood, why not build a custom range hood cover all by yourself? It is a great option to DIY range hood covers rather than replace the entire cabinet itself. Range hoods are considered an essential apparatus to the kitchen, especially if you love cooking a variety of items. The popularity of range hoods in kitchens made the necessity of range hood covers go sky-high.
Even when comparing the costs, building a custom hood cover is an option worth considering. An old range hood will be a disheartening sight in a kitchen. With an exposed and discolored range, it will suck up all the beauty of the kitchen. The best way to treat such a piece of machinery is to construct a custom range hood cover.
In this article, we will explore everything about how to DIY a range hood cover for your kitchen.
DIY Range Hood Covers
A range hood or kitchen hood is a necessary appliance in a kitchen. Range hoods are usually mounted a few inches above the cooktop and are used to vent out steam, grease, and smoke out of the kitchen. If you are someone who enjoys cooking, the steam and smoke will be an obvious irritation. Hence, range hoods are recommended to vent out all the fumes properly during the process of cooking.
There are ductless range hoods available for installation, which will rather recirculate the air back inside the home than entirely vent it out. In this article, we will be discussing a vented range hood that will completely take all the steam and grease out of the property.

Most of the modern range hoods come with a fan and lights attached to them. The fan boosts ventilation, and lights illuminate your cooktop while cooking. Range hood covers are used to encapsulate your range hood. It is very easy to DIY a custom range hood cover. Using cost-effective yet good-quality materials, constructing custom range hood covers can be a cakewalk.
When we are talking about covering a range hood, all it requires is to cover the sides, front, and top of the range hood and not the portion that includes a fan. You can choose from a wide variety of ways to cover a range hood to make the kitchen look sleek and finished.
When it comes to DIY approaches, you are the master. You can decide how your design and construction should look and what kind of customizations can be injected. In this article, when it comes to constructing a range hood cover, we are going to do it in a productive manner.
Having a storage option along with your range hood cover will be a great option for your kitchen. It will help you keep all the essentials in one place and grab them quickly while cooking.
Below are some materials required to DIY a range hood cover with a storage option.
- Lattice moldings
- Friction Lid Support
- Wooden Screws
- Finish Nails (11/4″)
- Brad Nails (58″)
- Continuous Hinge
You will require some mechanics and tools in order to build and fix the custom range hood cover in your kitchen. Below are the required tools for this DIY project:
As all the tools mentioned are considered a one-time investment, you can use them for your further DIY projects. Now that you have gathered all the essential items required to build a range hood cover let’s step into the actual DIY process!
How to DIY Custom Range Hood Covers with Storage
Step 1: Get Rid of The Old Range Hood
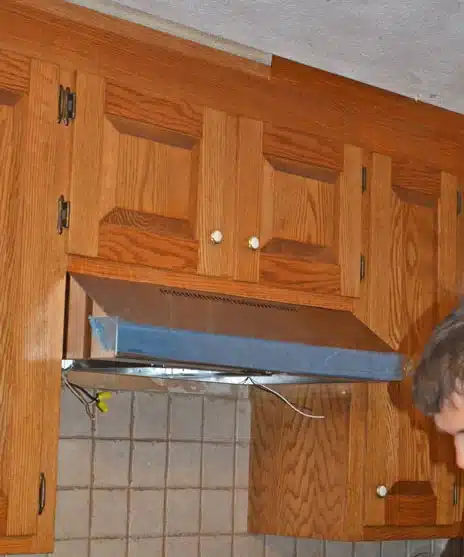
Let us start by omitting the old, rusty, decolored range hood. If your range hood is old and has been in your kitchen for over 30 years, it is best to replace the entire system with a new one. Just simply unscrew the old vent and replace it with the new one. It is suggested that you vent the newly installed range hood outside. A space can be made on the back of the range hood for this.
Step 2: Re-Shape the Cabinet

Considering that you might already have a cabinet above your range hood, it is suggested that you modify it. It is likely that the cabinet will have a divider in it. You can cut the divider using the saw to make the storage space bigger than before. Just remove the divider, and you will be good to proceed to the next step. After cutting the divider, you can do a quick check to locate the need for any patchwork. You can close or hide any holes or other small damages at this part.
Step 3: Cutting the Plywood
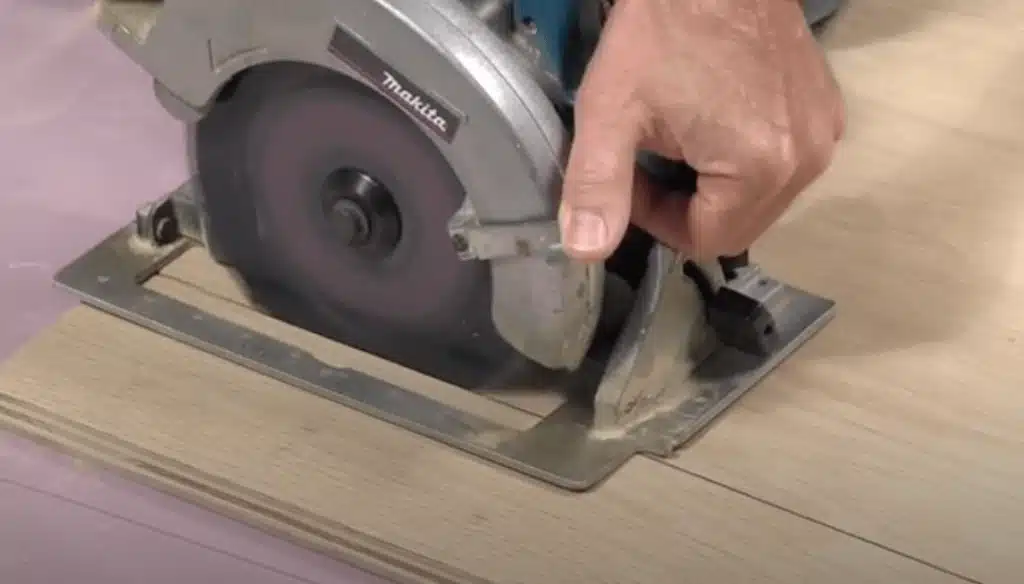
You should now start to take measurements in order to cut the plywood sheets accordingly. First, start measuring the length from the top of the cabinet to the bottom of the range hood. After this, measure the distance from the front of the cabinet to the front of the range hood. Once you have acquired these measures, it is now time to plan the angular cut of the range hood cover using plywood. To get a better idea, draw the already measured length on a piece of paper in the same shape and connect the top front part of the cabinet to the bottom of the hood.
Once the measurements are taken, you can now proceed to cut the plywood sheets accordingly. To avoid confusion, you can place the cut pieces of plywood on the range hood and check if they fit properly. You can order any additional parts if needed at this point. If you have any confusion, you can draw down the measurements on a piece of cardboard, cut them, and try doing a test fitting.
Once you are satisfied with the results, you can cut the plywood to the same measurement.
Step 4: Installing the Cover
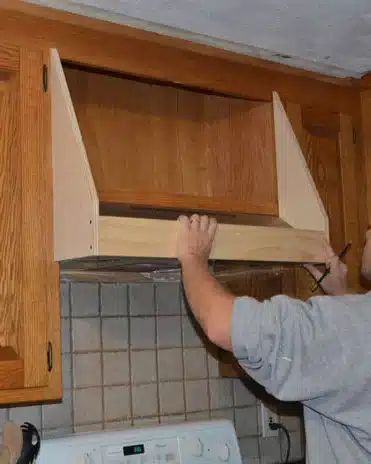
Attach the sides of the range hood cover first. Horizontal braces can be used to keep the sheets in place. Installing the sides of the range hood cover will support the bottom part well. After the sides are fixed, measure the distance between either side of the plywood and the front of the hood.
Cut the plywood sheet to this length and attach it to the sides. You can use the drill to screw the sheet together properly. Make sure to leave some space for proper airflow for better functioning of the system.
Step 5: Adding Trim

The whole point of adding a range hood cover is to make your kitchen look good. You can attach the trim to cover the base of the hood cover. This way, you can cover the nails drilled to fix the plywood cover. For better finishing and neatness, you can use the lattice moldings to attach throughout the edges and openings as desired.
Step 6: Constructing the Door

Here comes the comparatively challenging part of building range hood covers: building the door. To get a fair idea of measurement, get the largest dimensions of your already existing hood cover opening. Start with creating a pine frame for the range hood door. Here, you can make use of rabbet joins to make the edges of the pine frame connect properly for the door. Once the frame is set in place, measure its dimensions to cut the plywood to make the door surface.
The bottom angle of the door is an important part that requires careful cutting. To do this, you can first take a scrap of wood and measure the possible angle to close the door properly.
Once you are satisfied, you can make the same cut using a saw on the bottom of your door. This will help you find the right angle to close and open the door correctly. You can use lattice trim to secure the opening and gaps for a professional touch.
Step 7: Adding Hinges

For the door to operate seamlessly, hinges are required to be installed. You can either choose from euro hinges or continuous hinges. In this example, we are going with continuous hinges as they are easier to install and better functioning.
One of the best perks of using a continuous hinge is that the installation is done behind the door’s joining point, and no part of it will be visible outside. A quick look at your range hood cover will give a very clean and finished impression this way.
Sometimes, when it comes to the functioning of range hood storage area doors, it is a headache to keep the door open manually until you are done using the storage. To avoid this, you can attach a friction lid support to the door and the cabinet. This way, the lid or door of the storage will stay open until you close it.
Step 8: The Final Touch
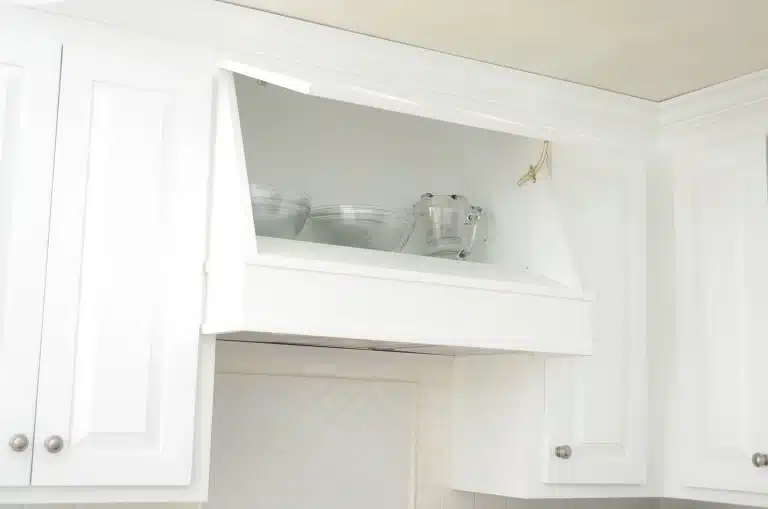
Once everything is done, it is now time to fill up the holes and gaps, if any. Also, to give a proper finished look, you can paint the entire range hood cover using a spray painter. The choice of paint is completely up to your convenience.
An all-white look can add a classic touch to your kitchen. You can also customize the color of your range hood cover to match the existing color and decor of the kitchen. Let the newly created range hood cover dry after painting, and you are done with constructing a custom range hood cover!
Final Word
We hope the above tutorial helped you construct a stunning and professional-looking range hood cover for your home. The additional storage space is always a great productivity benefit for range hood covers. Buying range hood covers online may not always fit your requirements and budget.
Constructing a DIY range hood cover comes with the option of endless customization for your home. The example used in this article is suited to the kitchen style and decor mentioned in it. You can always tweak the dimensions, cuts, and look as per your personal space!
All you have to keep in mind is to get all the required dimensions and planning right to install a DIY range hood cover like a professional!


