
9 Easy Steps for Making Signs with a Wooden Surface
Are you looking for guidance to create beautiful yet long-lasting signs?
The sturdiness and timeless beauty make wood the first choice for making a sign. A nicely carved or painted wooden sign is the best option for any space. Making signs with a wooden board is a process that needs guidance. It emits rustic vibes and is one of the best decor options for home and recreational spaces.
You don’t need to be an expert at painting or carving to make an attractive wooden sign. Making a wooden sign is a fun DIY project you can do single-handedly or with your friends/family. You can bond with your loved one by making an impressive wood sign.
This article takes you through each step of making wood signs for different occasions. Before we explore the journey of making these creative signs, let us see how they are helpful.
What Can You Make with Wood Signs?
Making signs on a piece of wood can be helpful in many situations. Some regular uses of a wood sign are –
- It can be the best nameplate for the entrance of your home
- Create an open/close sign for your cafe or restaurant
- Use as home decor for your bedroom/Livingroom or even bathroom
- A perfect gift with a beautiful quote written on it
- An aesthetic piece of decor for a wedding venue
- Express your love with beautiful wood signs on birthdays, anniversaries, Christmas, or Thanksgiving.
These are some of the places where you can use this handmade wood sign. Now, let’s quickly jump to the detailed process of making signs on wood.
Making Signs on Wooden Boards with 9 Simple Steps
1. Finding an Appropriate Piece of Wood

Select an appropriate piece of wood according to the purpose. If you are making signs for indoor placement, go with pine or plywood. Select cedar wood, redwood, or waterproof plywood when making signs for an outdoor space. Signs placed outdoors have to experience heat, cold, and water. Using suitable wood will guarantee the longevity of the wooden board.
You can purchase wood from the nearby hardware store or craft shop. If you have an old piece of furniture, you can also extract a small part from it to create a sign.
The thickness of the wooden piece can be anywhere between ¼” to ¾” inch, depending upon the purpose. Keep the width thicker if you want it to be huge, bulky, and sturdy. Also, select a heavier surface if you plan to carve on the wood.
Be extra careful while buying a fresh piece of wood for this project. The quality of the wood you work with will directly impact the lifespan of the final wood sign. To get a long-lasting sign select wood that is in raw form.
The wood has to be strong from within and reflect natural features. Select a wood that is free from any coatings or treatments.
2. Cutting it Into the Required Size

If you have already bought the perfect piece of wood, that’s great! However, if you have a wooden board in a large or inappropriate shape, you will need to do some reshaping.
If you do not have any tools at home, it is better to take help from a carpenter nearby. They will have the right tools and also know the perfect method of cutting the wood for making signs.
Here are a few tips if you are an enthusiast who wants to experiment and cut wood at home. First, buy equipment to help you cut the wood. Hacksaw, keyhole saw, Japanese saw, coping saw, or bow saw are some of the tools you can use.
This equipment will allow you to cut a significant amount in less time. Cover your eyes and nose to save yourself from the dust particles that arise during the cutting.
You can also take help from video tutorials to get a successfully shaped piece of wood. Here is a tutorialon how to cut a piece of wood with the help of a hacksaw. It will help you in getting through this step as a newbie.
3. Cleaning the Surface Thoroughly

Remember how we begin our day by cleaning ourselves and dressing up? It is only after cleaning up that you put on new clothes and makeup. This step is like cleaning and getting ready for that wooden board.
It is a crucial step that you cannot afford to miss. The cleaning prepares the wooden piece for its next creation.
Washing them with a simple mixture of hot water and soap is enough. However, if you are using a pre-used wooden board, it can have a lot of dirt and dust on it. Feel free to rub with a brush here and there to get a neat surface. Use a damp cloth by dipping it in soap-filled water. Dip the cloth in water and wring it to remove excess water.
The cleaning process will also eliminate any mildew spores if present on the wood. Once the cleaning process completes, let the wooden board rest for at least 24-48 hours before moving ahead.
Once your wooden board is clean, it’s time to move on to the next step.
4. Make the Surface Smooth by Using Fillers and Sanding

If you are using an old or used piece of wood for making signs, there is a possibility of damage. The holes or gaps caused due to nails, cracks, or imperfections call for an action plan. Filling those imperfections is the next step in this process. Wood filler is a sandable material that fills the gaps on a wooden surface.
The mixture consists of tiny wood fragments suspended in a water or petroleum-based binder. It hardens once applied and becomes affixed in the gaps. A water-based filler dries in less than an hour, and oil-based fillers take 1 to 6 hours to dry.
Wait roughly 20 minutes additionally for the wood filler to dry before proceeding to the next step.
The next step is to sand the surface. Sanding the wooden surface will make it even and smooth. With the help of sandpaper grit, you can begin the sanding process.
Never begin this process against the grain if you want a better outcome. To get the best results, sand in the same direction as the wood grain. While making signs, if you sand in the opposite direction of the grain, it may scratch the surface and look unattractive.
Stop the sanding once the surface feels free from any imperfection or unevenness. Sanding is a crucial process that will adjust the wood filler and make it look like a natural part of the surface. Using sandpaper is compulsory irrespective of whether you use a wood filler or not.
5. Polish or Color the Surface

After filling and sanding, the wood surface is ready to be polished or colored. Wipe the wooden board with a dry cloth to eliminate tiny dust particles. Some people choose to color the surface before carving or writing on it. Oil-based paint or acrylic colors are suitable for a wooden surface.
Darker shades like walnut, cherry, and mahogany stand out on the wood surface. Use beige, green, white, and gray shades on a lighter wooden board. Apply a layer of your favorite shade and give your wooden board a colorful background.
If you choose to keep the color of your wooden board as it is, polishing is the next step. Wooden surfaces become dull and lose their natural shine due to dust, sunlight, and other external factors.
Polishing helps in keeping the shine intact for a long period. Many wood polishes and wax are available to polish the surface.
The two outcomes you get after polishing are matte or gloss finish. A matte finish is ideal for a raw and rustic look. The glossy finish is perfect for a contemporary look with a minimum visibility of scratches.
Glossy gives a shinier look, reflecting light, whereas the matte finish gives a muted look.
6. Finalize the Design, Letters, Numbers, or Quote You Want

Once you have a polished or colored wooden board ready, making signs is the only thing left. It can consist of letters, designs, sentences, numbers, or a combination. The creativity you wish to add to your wooden sign depends upon the placement of the signboard. Finalize the content depending on the size of your wooden board. Filling it with excessive content can make it confusing.
Select fonts that fit the serves the purpose. Let’s assume you are making an Open/Close sign board for a cafe. The fonts and letters should be visible from a distance. If it is not visible, the whole purpose of making a signboard is defeated.
Once you finalize the content you want to add to the wooden board, we move on to the next step.
7. Get Creative with Paint/Stencil/Stickers/Carvings!
It’s time to put your creativity on the wooden board for making signs. However, there are various ways in which you can express yourself on the wooden board.
Let us understand how you can do it with four different options.
Paint

The easiest and simplest way is to paint your message or numbers with the help of color and a brush. If you are an expert at painting, you won’t need much time to do this. However, if you fear misalignment and messing up, use a pencil to create a rough boundary. Thicken those boundaries with the color and get a perfect wood sign.
If you don’t know how to use liquid colors and brushes, use a marker or a paint pen. To use a pen, apply glue over the wood’s surface where you want to create art. It will prevent the color from bleeding into the wooden board. Wait for an hour so that the glue dries. You can paint or write whatever you want with the help of a marker pen.
Stencils

Create stencils when you want a specific shape or font on your wooden board but don’t know how to draw it. Here are the simple steps for creating your stencils.
- Find out the design or letters you love the most!
- Get it printed on a piece of paper and cut the exact shape out, discarding the extra paper on the surrounding.
- Place the shape on another large piece of paper and draw the shape
- Simply cut out the drawn part to create a stencil of that shape
- Place this stencil on a wooden board and color it in any shade
You can easily create them at home or buy stencils from a craft store or online. Get the perfect outcome, even if you are not an artist. You can also use spray paint to create any shape or font with the help of a stencil.
Stickers

Add creativity and color to your wooden board without making a mess or hard work. Buy yourself unique and colorful stickers of different letters and numbers. You can stick the stickers on the wooden board in any order you want to form a word or series. A signboard made in this way might quickly lose its charm when placed outdoors. Stickers will last long only when the board remains indoors.
Carvings

The most time-consuming yet beautiful way is to carve on your wooden board. Some of the tools for carving on a wooden surface are a set of chisels with a straight and curving edge. You will also need a pencil, pen, paper, and hammer to create an outline for carving. If you have an experience with carving, using a power chisel can make this job easy. Here is a tutorial video on how to hand-lettering wooden signs.
Above are the four unique ways to add content or design to your wooden board. There is no rule that you only have to use a single method to create your sign board. Feel free to combine one or more of these methods to enhance the beauty of your wooden sign. After all, there are no rules when it comes to creativity.
8. Apply a Protective Layer!
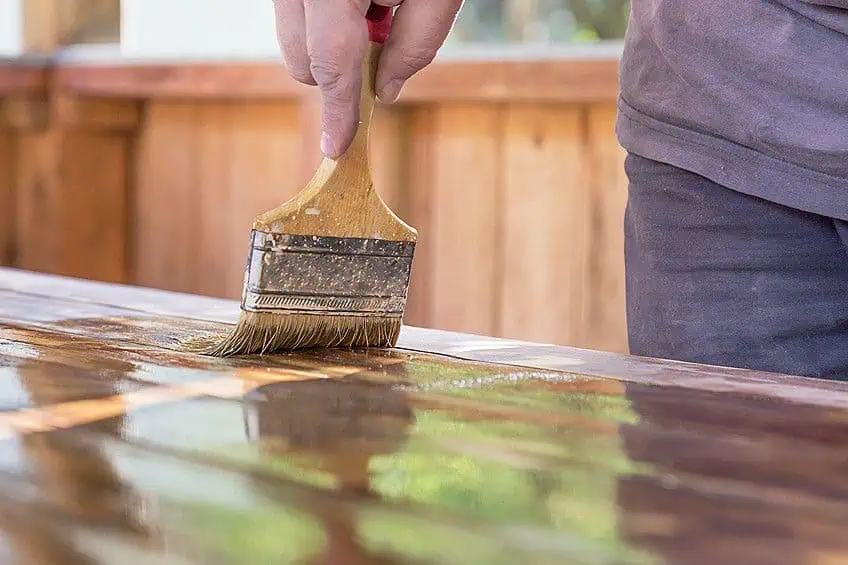
Once you have created a beautiful wooden sign with letters, numbers, or art, it’s time to protect it. Making signs is not a process done daily. This hard work needs to be protected. It is necessary to keep the colors, marker pen and designs safe from wear and tear. It allows the sign to last for years to come. Use a wood sealant as a protective layer after expressing your creativity on the wooden surface.
It protects your sign from moisture, dirt, and other damaging elements. It is also crucial to apply the sealant correctly for best results. Applying a protective layer is not a compulsory option; skip it if you wish.
Without the protective layer, the signboard will still be fresh for a few months. However, having a layer gives you relief in the harsh seasons.
9. Hang the Wood Sign and Enjoy

It brings us to the final step of making signs and hanging them. You can either hang it with the help of a D-ring, sawtooth, keyhole slot, french cleat, or a wire. You can also use plastic drywall or metal wall anchors for heavy wooden signs. Select your medium of hanging after considering the weight of your wooden sign. Once you place your sign on the wall, it’s time to cherish all the hard work and determination you put into it to go through the process.
Don’t forget to clean the wood sign regularly to keep it free from dust and dirt. After all, it’s an outcome of your efforts! To make it last for years, care properly!
It’s Time to Make a Wood Sign Now!
The instructions are here, and now it’s time for action! Begin by deciding the purpose and confirming the size of your sign. Get the raw materials and keep this article handy. Celebrate and appreciate yourself as you proceed toward the next step. Fearlessly show your creativity and fill the sign board with unique shapes, colors, and letters.
Making signs are one of the best recreational activities you can do with your loved ones. It’s great if you need the wood sign for a specific purpose. However, even if you don’t need it, make a beautiful sign and gift it to someone you love. After all, you don’t need a purpose to express your creativity.
So, are you ready to show your creativity through a wood sign?


